


Marine DC‑DC Charger: Size It 10–20% and Avoid Wiring Mistakes
A DC‑DC charger is worth adding if your boat runs a lithium (LiFePO4) house bank, a high‑draw trolling motor, or a smart alternator that can’t push a clean charging voltage to a separate battery bank. If you’re running a single lead‑acid battery with basic accessories, a standard automatic charging relay (ACR) is still fine. Check the sizing checklist below before you buy anything.
TL;DR:
- A DC‑DC charger is essential for lithium house batteries, smart alternators, or systems with high current draw, converting fluctuating alternator voltage into a proper charge profile.
- Proper wiring, cable sizing, fuse placement, and ventilation are critical for optimal charger performance and longevity, especially on boats with long cables or poor airflow.
- Isolated chargers are necessary for boats with separate grounds or active cathodic protection systems, while non-isolated models suit unified ground setups; verify your system before choosing.
- Charger sizing should be based on 10 to 20% of the battery bank’s capacity and support alternator output, with special consideration for smart alternators and variable engine RPM.
- Regular inspections and correct installation practices can prevent common issues like corrosion, voltage drop, and faulty charge cycles, avoiding early battery failures.
Table of Contents
- What Does a DC‑DC Charger for a Boat Actually Do?
- Isolated vs. Non‑Isolated: Does Your Boat Need Galvanic Isolation?
- How Do You Size a DC‑DC Charger for Your Boat’s Battery Bank?
- Installing a DC‑DC Charger: Cable Sizing, Fusing, and Placement
- How Does a DC‑DC Charger Work With Solar and Shore Power?
- Choosing the Right Battery for Your DC‑DC Charging Setup
- Maintenance and Troubleshooting Tips for Marine DC‑DC Chargers
- Safety and Marine Electrical Standards for DC‑DC Charger Installs
- An Installer’s Take: What Actually Matters on the Water
- Get the Right Battery and Charger Setup From Bansheebatteries
- Sources
What Does a DC‑DC Charger for a Boat Actually Do?
A DC‑DC charger takes the raw, fluctuating voltage from your alternator and converts it into a clean, chemistry‑specific charging profile for your house battery. That’s different from a plain DC‑DC converter, which just steps voltage up or down without managing a charge curve, and it’s different from an ACR, which simply connects two banks together once voltage crosses a threshold, treating both batteries as though they need the same treatment.
That distinction matters because lithium and lead‑acid batteries want completely different charging behavior. Multistage charging pushes bulk current early, then tapers through absorption and float stages tuned to each chemistry. A DC‑to‑DC charger applies battery‑specific multistage charging, which is exactly why it’s the preferred setup when a LiFePO4 house bank sits behind a lead‑acid starter battery.
A few real-world examples where this changes outcomes:
- A center console with a lead‑acid starter and a LiFePO4 livewell/electronics bank, where an ACR would overcharge or undercharge one side.
- A pontoon boat running a 36V trolling motor bank that needs a charger able to step voltage up, not just pass it through.
- A center console with a smart alternator that cuts voltage for fuel economy, starving a downstream bank without active charge management.
Isolated vs. Non‑Isolated: Does Your Boat Need Galvanic Isolation?
Isolation refers to whether the input and output circuits of the charger share a common ground or are electrically separated by a transformer. On a boat, that choice touches your cathodic protection system and any electronics sensitive to ground loops.
When isolation is essential:
- Boats with separate positive and negative grounds between engine and house systems.
- Vessels with active cathodic protection (zincs, impressed current systems) where a shared ground could accelerate corrosion.
- Setups combining AC shore power with DC charging, where isolation limits stray current paths.
When non‑isolated is acceptable:
- Simple single‑ground systems with no AC shore power tied into the same bonding network.
- Smaller boats where wiring runs are short and grounding is already unified.
Non‑isolated chargers, like the Victron Orion XS line, tend to be smaller and less expensive, but they assume a shared ground. Isolated units cost more and need more careful wiring, but they remove a whole category of corrosion risk.
Pro Tip: If you’re not sure whether your boat has separate grounds, check with a marine electrician before assuming a non‑isolated charger is safe. Guessing wrong here is expensive.
How Do You Size a DC‑DC Charger for Your Boat’s Battery Bank?
Sizing comes down to matching charger output to your house bank’s capacity and your alternator’s real‑world output, not its nameplate rating.
- Match amps to bank size. A rough starting point is 10 to 20% of your house bank’s amp‑hour rating in charger output, so a 100Ah LiFePO4 bank pairs well with a 20 to 40A charger. Trolling‑motor banks with heavier daily draw often justify sizing toward the higher end.
- Check alternator headroom. Your alternator has to support the charger’s draw on top of everything else already running. A 60A alternator feeding a 40A DC‑DC charger while also running electronics and pumps can come up short.
- Account for smart alternators. Vehicles and engines with smart or variable‑voltage alternators need chargers with wide input voltage ranges and boost capability. The Orion XS series is built for smart-alternator compatibility, which prevents undercharging when the alternator’s output voltage drops on purpose.
- Plan for idle vs. cruising RPM. Alternator output at idle is a fraction of what it produces at cruise. Expect slower charging at the dock or trolling speeds, and don’t size your charger assuming cruise‑RPM output all the time.
If one charger can’t cover your load, some owners parallel two units rather than jump to an oversized single charger. Just confirm the manufacturer explicitly supports parallel operation first.
Installing a DC‑DC Charger: Cable Sizing, Fusing, and Placement
Most charger problems trace back to wiring, not the charger itself. Get the install right and the unit will run for years without drama.
- Placement: Mount the charger as close to the service (house) battery as practical. Every extra foot of cable is more voltage drop and more heat.
- Cable sizing: Follow the manufacturer’s AWG chart for your amperage and run length, and measure voltage drop under load once installed rather than trusting the chart alone. Installers consistently point to proper AWG sizing and short cable runs as the difference between a charger that performs to spec and one that runs hot and underdelivers.
- Fusing: Install a fuse or breaker within about 7 inches of each battery terminal, sized to the cable’s ampacity, not just the charger’s rated output.
- Mounting and ventilation: Mount horizontally if the manufacturer recommends it, and leave clear airflow around the case. Chargers in tight, unventilated lockers get derated; most datasheets note reduced output above roughly 104°F ambient.
- Post‑install test: Run the engine from idle through cruising RPM and watch the charger’s LED status or a connected battery monitor to confirm it steps through its charge stages correctly.
Forum discussions among installers repeatedly flag the same issue: long cable runs and cramped, poorly ventilated mounting spots force output derating on boats where the charger would otherwise perform fine. Solve for airflow and cable length before you second‑guess the charger’s rating.
How Does a DC‑DC Charger Work With Solar and Shore Power?
A DC‑DC charger handles the alternator side of your charging picture. It doesn’t replace a solar charge controller or a shore power charger, and it shouldn’t be asked to.
- Alternator role: The DC‑DC charger manages what comes from the engine. It’s not designed to regulate panel output, so a separate solar charge controller still handles that job.
- Charging sequence: A common, workable setup runs all three sources into the same house bank, each with its own charge controller, so the battery sees one consistent target voltage regardless of which source is active.
- BMS and remote on/off: If your LiFePO4 bank has an internal battery management system, confirm its voltage setpoints match your DC‑DC charger’s profile. Conflicting setpoints between a BMS and a charger cause premature charge cutoffs or undercharging, and it’s one of the most overlooked failure points in mixed‑source systems.
For a high‑power, marine‑specific example of this kind of integration, the Dometic DCPM manages DC voltage bidirectionally and reports over NMEA2000, giving a picture of what a fully integrated system looks like at the higher end of the market.
Choosing the Right Battery for Your DC‑DC Charging Setup
A DC‑DC charger only performs as well as the battery it’s charging. Bansheebatteries has built AGM and lithium (LiFePO4) batteries for marine and powersports use for more than 20 years, backed by a 4‑year warranty on AGM batteries and a 5‑year warranty on lithium marine batteries.
- A LiFePO4 house bank is where a DC‑DC charger earns its keep, since lithium’s tighter voltage tolerances make chemistry‑specific multistage charging far more valuable than it is on a simple lead‑acid bank.
- If you’re weighing chemistries before you commit to a charging setup, the AGM vs. lithium marine battery comparison walks through the tradeoffs in plain terms.
- Not sure which battery fits your boat and electrical load? The marine battery collection is a good starting point before you finalize charger amperage.
Maintenance and Troubleshooting Tips for Marine DC‑DC Chargers
DC‑DC chargers are largely maintenance‑free, but a few checks a season catch most problems before they leave you with a dead house bank.
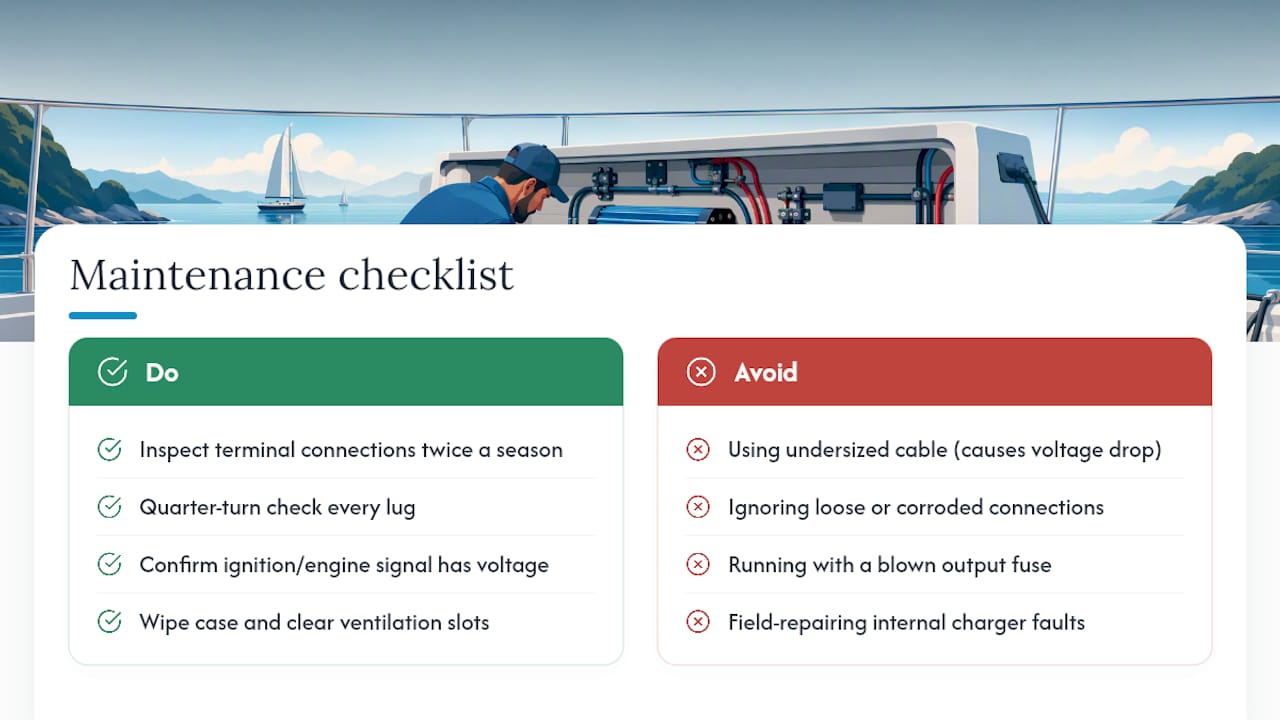
Inspect terminal connections at both the charger and the battery for corrosion or looseness at least twice a season, since a loose marine connection is one of the most common causes of erratic charging. Vibration from engine operation and wave slap loosens ring terminals over time, so a quarter‑turn check on every lug is worth the five minutes.
If the charger’s LED indicator shows a fault or the unit won’t enter its charge cycle, start with the basics: confirm the ignition or engine‑running signal wire (if your model requires one) has voltage, check that input voltage from the alternator is within the charger’s rated range, and verify the output fuse hasn’t blown. A charger that cycles on and off repeatedly, sometimes called “hunting,” usually points to a voltage drop problem in undersized cable rather than a failed charger.
Dust and salt buildup around vents reduces cooling, so wipe down the case and clear any debris from ventilation slots during routine engine maintenance. If you’re running a Bluetooth‑enabled model, compact chargers with app‑based monitoring make it easy to spot a charging anomaly from your phone before it becomes a dead battery at the dock.
When a charger repeatedly won’t hold its charge stages despite good wiring and clean connections, the fault is usually internal, and replacement under warranty is more sensible than field repair.
Safety and Marine Electrical Standards for DC‑DC Charger Installs
Marine DC wiring isn’t the same environment as an automotive install. Constant vibration, saltwater exposure, and confined engine compartments raise the stakes on every connection.
Every DC‑DC charger install should include a properly sized fuse or breaker within roughly 7 inches of each battery terminal, tinned marine‑grade wire rather than standard automotive cable, and heat‑shrink or adhesive‑lined connectors at every joint to resist corrosion. Mounting location matters for safety as much as performance: keep the charger away from bilge water, fuel vapor sources, and battery compartments that vent hydrogen gas during charging, since most units aren’t rated for direct exposure to flammable vapor.
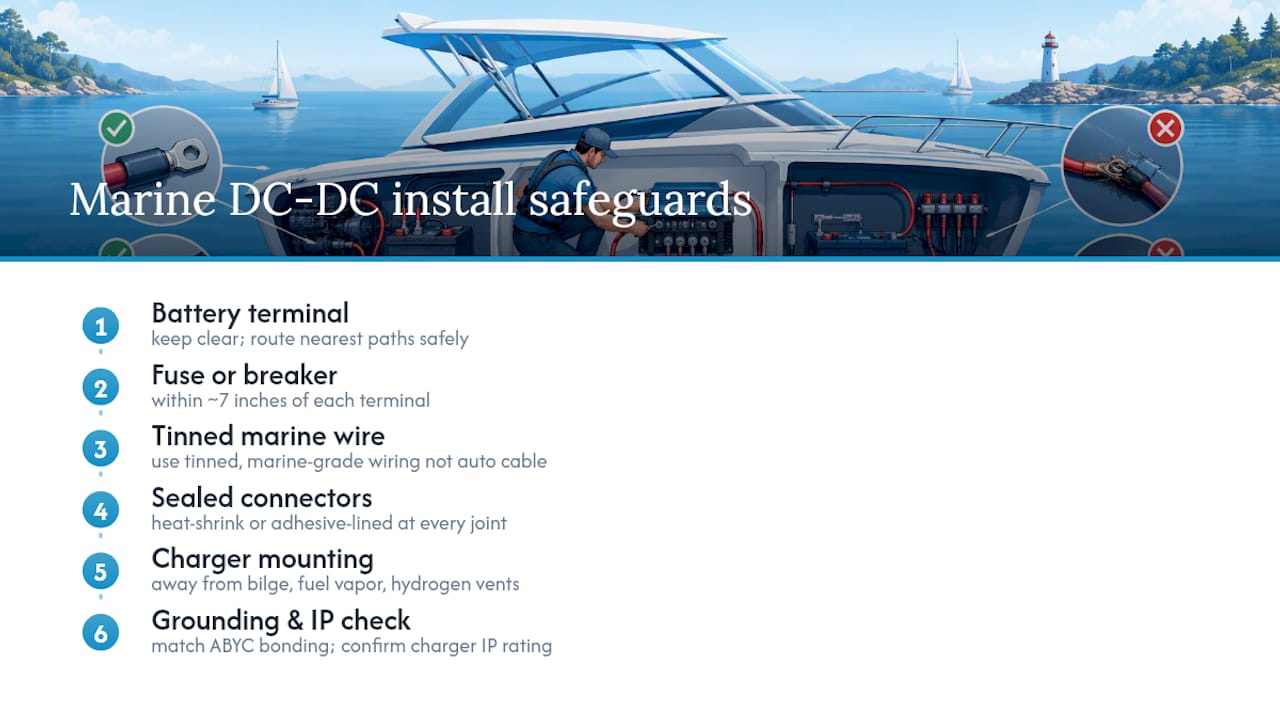
Check the charger’s IP rating against where you’re actually mounting it. A unit rated IP65, like the Orion XS, tolerates splash and spray, but that’s not the same as submersion protection, so don’t mount it below the waterline or in a bilge that regularly takes on water.
If your boat’s electrical system was professionally wired to ABYC standards, keep the DC‑DC install consistent with that existing bonding and grounding scheme rather than introducing a new ground path. Mixing grounding philosophies between an isolated charger and a non‑isolated one elsewhere in the system is a common way accidental galvanic corrosion starts. When in doubt about your boat’s grounding architecture, that’s a job for a marine electrician, not a weekend guess.
An Installer’s Take: What Actually Matters on the Water
Three things decide whether a DC‑DC install holds up: safety first, wire size second, and matching the charger’s profile to your battery chemistry third. Skip any one of those and you’re gambling with either a fire risk or a battery that dies early.
The most common mistakes are undersized cable runs, mounting the charger somewhere with no airflow, and assuming an ACR is “close enough” for a lithium bank. None of those show up immediately. They show up six months later as a battery that never quite reaches full charge.
If your boat has separate grounds, cathodic protection, or you’re not confident reading a wiring diagram, hire a marine electrician. The cost of getting it checked is nothing next to the cost of a corroded hull or a fried battery bank.
— Donald
Get the Right Battery and Charger Setup From Bansheebatteries
A DC‑DC charger only protects a battery built to handle its charging profile, and that’s where Bansheebatteries fits into the picture you just read. Backed by more than 20 years building AGM and lithium batteries for marine use, Bansheebatteries pairs every LiFePO4 marine battery with a 5‑year warranty, longer coverage than most stock lead‑acid replacements carry.
If you’re moving to a LiFePO4 house bank to take full advantage of a DC‑DC charger’s multistage profile, start with the lithium marine battery collection to find the right amp‑hour rating for your boat. Still deciding between chemistries or unsure what fits your electrical system? The best boat battery chargers guide breaks down pairing options in more detail, and Bansheebatteries’ team can walk you through sizing before you order.
Sources
- Installing a DC-to-DC Charger on Your Boat — Boating Magazine
- Orion XS DC-DC battery chargers — Victron Energy (datasheet)
- 12V 20A/40A DC to DC Battery Charger — Renogy