


Prevent Battery Damage During Repair: A Safety-First Workflow
Disconnect and isolate the battery before you touch anything else. That single step prevents most of the accidental damage, shorts, and fires that happen during vehicle repair and collision diagnostics. If you see swelling, smell a sweet or acrid odor, or notice smoke, stop immediately and move the vehicle or pack away from anything flammable.
Before you pick up a tool, run through this:
- Clear the workspace of flammable materials and confirm good ventilation.
- Put on eye protection and appropriate gloves; ground yourself with an ESD strap near electronics.
- Disconnect the 12V battery (negative first) or confirm EV high-voltage isolation before opening anything.
- Photograph connector positions and wiring before you disturb them.
- Keep a metal container or dry sand within reach in case of venting.
If you spot swelling, hissing, heat, or a chemical smell, stop work, isolate the battery on a non-flammable surface, and do not attempt to charge, puncture, or “fix” it yourself.
Key Takeaways
Preventing battery damage during repair comes down to isolating power first, documenting every step, and escalating HV work you’re not certified to handle.
| Point | Details |
|---|---|
| Isolate before anything else | Disconnect the 12V battery or confirm HV isolation before opening any panel or shield. |
| Know the warning signs | Swelling, odor, heat, or hissing means stop work and isolate the pack immediately. |
| Document every stage | Photograph connectors and wiring before disconnecting to prevent reassembly errors. |
| Escalate HV work | Persistent fault codes, coolant leaks, or visible pack damage require a certified HV specialist. |
| Replace when necessary | Bansheebatteries offers chemistry-matched AGM and LiFePO4 replacements with matched chargers when repair isn’t safe. |
Table of Contents
- Why Preventing Battery Damage During Repair Matters
- How Do You Know a Battery Is Damaged?
- What Should Your Pre-Repair Safety Checklist Include?
- How Do You Safely Disconnect and Access a Battery?
- When Should You Escalate to a Certified HV Technician?
- How Do You Confirm the Battery Is Safe After Repair?
- How Should You Store and Dispose of a Damaged Battery?
- Should You Repair or Replace the Battery?
- What Do Manufacturers Recommend for Handling Different Battery Types?
- What Do You Do If a Battery Starts Smoking or Catches Fire?
- What Separates a Safe Repair From a Lucky One
- Get the Right Replacement Battery and Charger for the Job
- Frequently Asked Questions
- Sources
Why Preventing Battery Damage During Repair Matters
A damaged battery isn’t just a bad part, it’s a fire risk sitting under your hands. Lithium-ion failures can escalate into thermal runaway from physical damage, electrical abuse, extreme heat, or manufacturing defects, and once that chain reaction starts, it’s very hard to stop. The NFPA advises stopping charging once a battery is full and using only compatible charging equipment, exactly the kind of detail that gets skipped mid-repair when someone’s in a hurry.
Collisions compound the risk. A bent bracket, a torn wiring harness, or a cracked case can hide damage that surfaces weeks later as an intermittent short or a dead cell. Collision repair diagnostics exist specifically because batteries take hidden electrical and structural hits in a crash that don’t show up on a visual walkaround. Skip that check, and you’re sending a customer home with a battery that’s one bump away from failing.
How Do You Know a Battery Is Damaged?
Trust your senses before you trust your multimeter. A battery that’s physically compromised will usually tell you before it fails catastrophically, if you know what to look for.
Watch for these signs:
- Swelling or bulging in the case
- Cracks, dents, or punctures
- An unusual sweet, acrid, or nail-polish-remover smell
- Hissing, popping, or crackling sounds
- Leaking fluid or crusty residue near terminals
- Excessive heat with no obvious load
- Sparking or visible smoke
If you see any of these, stop work immediately. Move the battery to a non-flammable surface, cover the terminals with non-conductive tape, and clear people from the immediate area if it’s venting. Swelling in particular signals internal gas buildup from chemical breakdown, and trying to flatten or compress a swollen cell to “make it fit” is one of the fastest ways to trigger thermal runaway.
Never charge, puncture, or mechanically compress a battery that’s leaking, swollen, or emitting an odor. Isolate it and treat it as a hazard until it’s professionally handled.
What Should Your Pre-Repair Safety Checklist Include?
Most battery damage during repair happens in the first ten minutes, before the actual fix even starts. A repeatable pre-job routine catches the mistakes that improvisation misses: wrong tool, no documentation, cluttered bench, no ESD control.
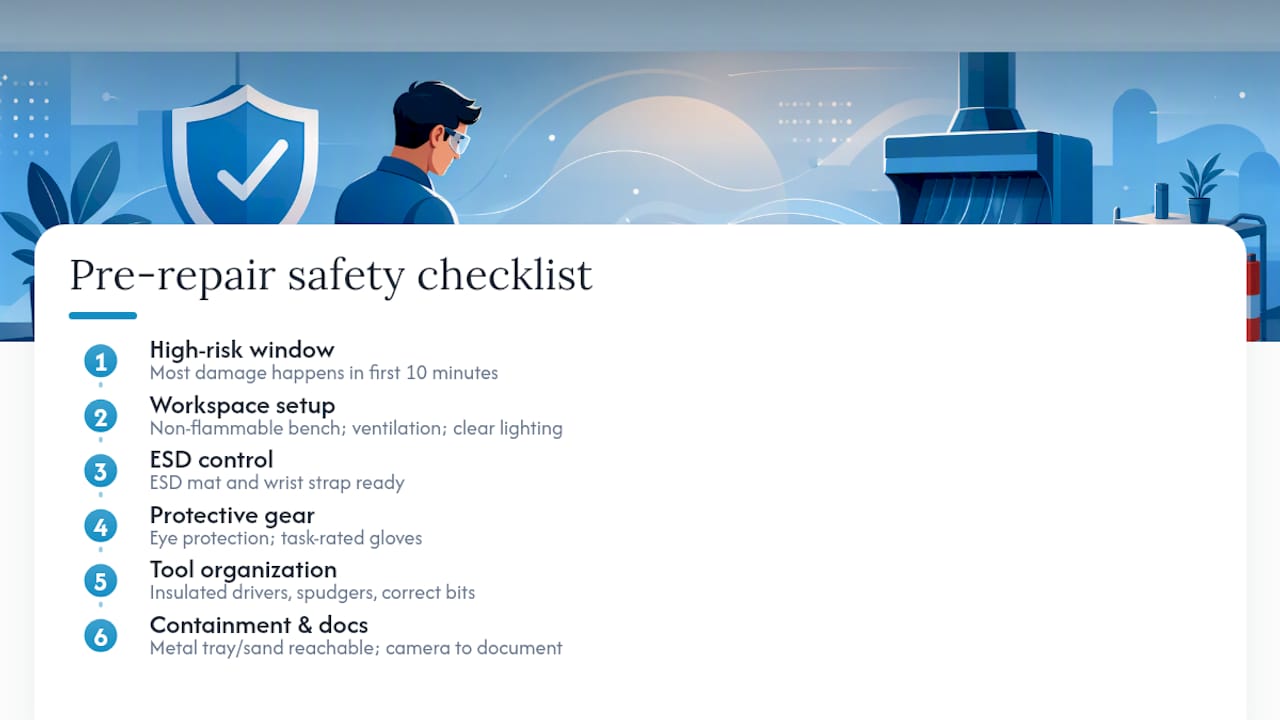
Start with the workspace. Work on a non-flammable bench with good ventilation and clear lighting, keep an unobstructed path to an exit, and remove rags, solvents, or other flammables from the immediate area. A documented pre-job setup with proper ESD control cuts down on the incidents that come from rushed, improvised setups.

Gear matters just as much as the bench. Wear eye protection and gloves rated for the task (cut-resistant for sharp housings, nitrile for chemical exposure), and use an ESD mat and wrist strap whenever you’re near circuit boards or battery management electronics.
Organize your tools before you start: non-conductive spudgers and insulated drivers, the correct bit sizes for the fasteners you’ll encounter, a screw map or labeled tray, and a camera or phone ready to document each stage. Keep containment materials like a metal tray or dry sand within arm’s reach, not in a cabinet across the shop.
Pro Tip: Keep a laminated pre-job checklist taped inside your toolbox lid. Techs who check boxes on paper skip fewer steps than techs who “just remember.”
How Do You Safely Disconnect and Access a Battery?
Controlled entry is the whole game here. How you open the compartment depends on the closure type, screws call for the correct bit and torque, clips need a plastic spudger instead of a metal pry tool, and adhesive-sealed covers need controlled heat rather than brute force.
Follow this sequence on every job:
- Open a single access point first rather than removing every panel at once.
- Remove only the minimal shielding needed to see the battery and its connectors.
- Photograph connector orientation and wiring routing before disconnecting anything.
- Locate the battery and disconnect it before you unplug or move any other component.
- Verify no loose tool, screw, or wire is bridging the terminals before proceeding.
This order matters because disconnecting the battery before touching other components removes the live power source before you’re working near exposed contacts elsewhere in the system.
A few habits reinforce the sequence:
- Never slide a metal tool underneath or around a battery pack; even brief conductive contact can bridge terminals and cause a short.
- Keep loose fasteners in a labeled tray, not your pocket.
- Recheck isolation with a meter before you assume it’s safe to proceed.
When Should You Escalate to a Certified HV Technician?
EV traction packs operate on a different level of risk entirely, and the line between “technician job” and “certified specialist job” needs to be drawn before you open anything.
Do this every time:
- Confirm HV isolation and lockout/tagout status before touching the pack.
- Follow the OEM’s documented isolation sequence exactly, not a generalized version from memory.
- Wear rated HV PPE (insulated gloves, face shield) for any work near the pack.
Don’t do any of this without certified HV training:
- Open a sealed traction pack.
- Remove HV interlocks without following the OEM procedure.
- Continue work if a coolant leak is found near the pack.
Stop and call a certified HV specialist or the OEM service line the moment you see persistent HV fault codes, visible pack deformation, or coolant intrusion. Reporting on EV repair has flagged how dangerous improvised traction-pack work can be, which is exactly why mechanics increasingly rely on trained specialists rather than treating an EV pack like a bigger version of a 12V battery. Document every isolation step with timestamps and photos, both for your own liability and for the next technician who opens the vehicle.
How Do You Confirm the Battery Is Safe After Repair?
Reconnecting a battery isn’t the finish line, testing is. Skipping this step is how a repair that looked fine on the bench turns into a comeback a week later.
For 12V systems, run through:
- Open-circuit voltage check immediately after reconnection.
- Resting voltage measurement after a full charge cycle.
- Load test or CCA check against the battery’s rated capacity.
- Visual inspection of terminal tightness and corrosion.
For EV and traction packs, add:
- Insulation resistance testing per OEM specification.
- Full HV system self-test sequence.
- BMS fault code clear, followed by a monitoring period.
- Thermal behavior check under light load before returning the vehicle to normal use.
Log every result with timestamps and photos. That record protects you on warranty claims and gives you a baseline if the customer comes back with an unrelated complaint later. If you’re reinstalling a motorcycle or powersport battery, a correct installation and torque sequence matters just as much as the electrical test.
How Should You Store and Dispose of a Damaged Battery?
A battery that failed inspection doesn’t belong on a shelf next to good stock. Keep it in a ventilated area, on a non-flammable tray, at least a safe distance away from structures (https://www.allencounty.in.gov/754/Lithium-Battery-Safety) until it’s collected for proper disposal, and never attempt to repair a swollen or cracked cell yourself.
For transport:
- Cover both terminals with non-conductive tape.
- Secure the pack so it can’t shift or vibrate against other cargo.
- Use a carrier that specifically accepts damaged lithium shipments, standard parcel services often won’t.
For disposal, use a certified battery recycler or your local hazardous-waste program. FDNY guidance is blunt on this point: recycle at a designated drop-off site, never in household or shop trash. If you’re storing a healthy LiFePO4 battery between jobs rather than disposing of a damaged one, the storage state-of-charge guidelines are worth bookmarking separately.
Should You Repair or Replace the Battery?
Some damage is fixable. Corroded terminals, a loose cable lug, or a failed individual module in a larger pack can often be serviced. Swelling, punctures, internal shorts, or any sign the case integrity is compromised means replacement, full stop, no reconditioning attempt.
Expect diagnostic and labor charges to vary by shop and region, with HV specialist fees running higher than standard 12V service due to the certification and equipment involved. Manufacturing a new battery does carry its own carbon footprint, which is a real reason to repair when it’s safe to do so, but that consideration never outweighs a safety call. If the pack shows any of the disqualifying signs above, warranty terms and basic safety obligations both point the same direction: replace it.
- Repairable: corrosion, loose connections, single failed module.
- Replace immediately: swelling, puncture, internal short, case damage.
- Reconditioning has limits, a deep-cycle reconditioning guide is worth reading before you attempt it on marginal cells.
What Do Manufacturers Recommend for Handling Different Battery Types?
Chemistry changes the rules. LiFePO4 cells are more dimensionally stable than other lithium chemistries, according to Banshee Batteries, but they still demand strict isolation procedures and a charger matched to that chemistry, using a lead-acid charger on a lithium pack is a common and preventable mistake. AGM batteries behave differently again: they’re sealed and less prone to swelling, but rough handling can still crack the case and cause acid seepage.
- Match the charger to the chemistry every time, never assume compatibility.
- Store at manufacturer-recommended state-of-charge, not full or empty.
- Document every diagnostic step and part replaced to keep warranty coverage intact.
- Reference OEM torque and connection specs rather than “close enough.”
What Do You Do If a Battery Starts Smoking or Catches Fire?
Human safety comes before the vehicle, every time.
- Evacuate the immediate area and get everyone clear of fumes.
- Call emergency services right away, don’t wait to see if it settles down.
- Keep bystanders back and do not attempt to move or pick up a smoking pack.
Containment helps only if it’s safe to attempt: a metal container or dry sand can smother a small, contained incident, but don’t use water on a battery fire without guidance from trained responders, since it can react unpredictably with certain chemistries. Once the immediate danger has passed, notify your local fire authority and the battery manufacturer for guidance on safe disposal of the damaged unit.
What Separates a Safe Repair From a Lucky One
Most of the battery damage I’ve seen traced back to shortcuts, not bad luck: poor lighting, the wrong tool grabbed because the right one was buried in a drawer, no photos taken “because it’s a quick job.” A documented, repeatable sequence removes the improvisation that causes those mistakes under time pressure.
The technicians who escalate HV issues instead of guessing are the ones who never end up in an incident report.
Get the Right Replacement Battery and Charger for the Job
If a repair confirms the battery is past saving, Bansheebatteries gets you back on the road with a chemistry-matched replacement instead of a generic guess. The lineup covers LiFePO4 marine batteries built for vibration and deep-cycle demands, powersport lithium batteries sized for motorcycles, ATVs, and UTVs, and AGM options backed by a 4-year warranty against a 5-year warranty on lithium marine batteries.
Every product page includes chemistry-specific installation notes and charger compatibility details, so you’re not guessing whether your existing charger will damage a new lithium pack the way it might have damaged the old one. Check the full battery and charger range before you order, match the charger to the chemistry, and confirm fitment against your vehicle before checkout.
Frequently Asked Questions
What is the single most important step to prevent battery damage during repair? Disconnect and isolate the battery before touching any other component. Most accidental shorts and shock hazards happen when technicians work around a live battery instead of powering it down first.
Can you repair a swollen lithium battery? No. Swelling signals internal gas buildup from chemical breakdown, and attempting to repair, compress, or continue using a swollen cell risks triggering thermal runaway. Remove it from service and isolate it for proper disposal.
How do you know if an EV battery repair needs a certified specialist? Stop and escalate if you see persistent HV fault codes, coolant intrusion into the pack, visible structural damage, or if you cannot confirm safe isolation using the OEM’s documented procedure.
What tools should you avoid using near a battery pack? Avoid metal pry tools or probes near battery terminals. Even brief conductive contact can bridge contacts and cause a short, so use plastic spudgers and insulated drivers instead.
How long should a damaged battery be stored before disposal? Store it only as long as necessary, in a ventilated area at least 10 feet from structures, and arrange pickup by a certified recycler or hazardous-waste program as soon as possible rather than leaving it in general storage.
Sources
- Lithium-Ion Battery Safety (NFPA)
- Reasons Collision Repairs Should Involve Battery Diagnostics
- Be FDNY Smart when using devices powered by lithium-ion batteries
Save these links to your shop reference folder for quick access during future jobs.